- Getting Started
- Introduction
- Setting up the Environment
- DM System Commands
- DM Command usage examples
- Getting some data into the system
- Creating experiments based on the ESAF/Proposal
- Displaying information in the system
- Creating experiments based on the ESAF/Proposal
- dm-station-gui
- Overview
- Experiments
- Getting Files into Data Management
- Workflows and processing data
Getting Started
Introduction
The APS Data Management System is a system for gathering together experimental data, metadata about the experiment and providing users access to the data based on a users role. This guide is intended to provide beamline users an introduction to the basic use of the Data Management System at the beamline. This process will involve creating an experiment, associating users with this experiment and then adding data, in the form of files, to the experiment.
Setting up the Environment
On beamline Linux computers, users can set up the environment for using the Data Management System by executing a setup script which is created as the Data Management software is installed. This script is executed as
/home/DM_INSTALL_DIR/etc/dm.setup.sh
where DM_INSTALL_DIR is the deployment directory for this beamline. This script will set up a number of environment variables which define items such as URLs for the various data services, the station name in the DM, the location of a file which defines the login to be used when running commands and adding the path to DM system commands to the PATH.
DM System Commands
After execution of the setup script, the PATH will include the path to commands for interacting with the DM System. A list of these commands, at the time of this writing is shown below.
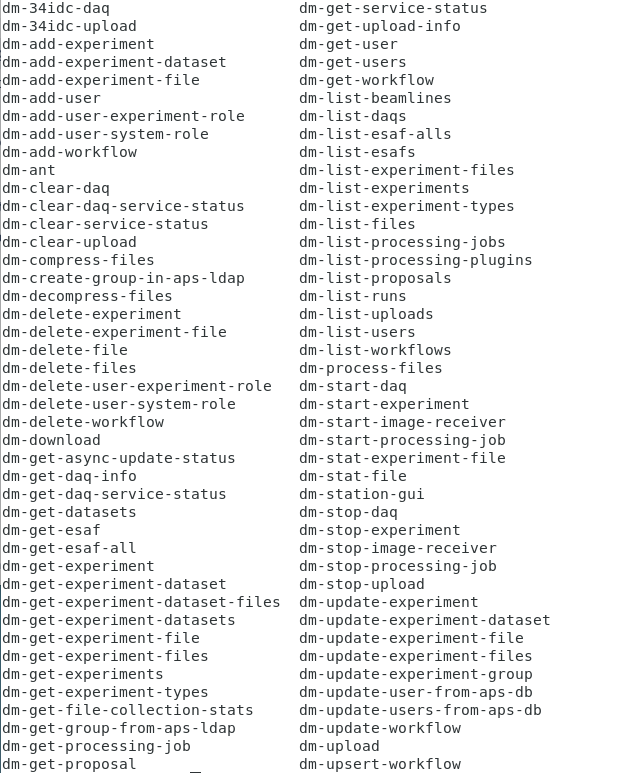
These commands follow some conventions, like adding a --help for convenience. When the environment variable DM_LOGIN_FILE is defined and points to a file that contains a username/password pair (in the form 'username|password') this information is used for authentication when executing the commands. In practice the account defined here should have the role of station manager for the beamline.
DM Command usage examples
Getting some data into the system
As stated early, the experiment is the central object for creating entries in the Data Management System. For convenience there are two commands which can provide examples of creating experiments, assigning users & other attributes and loading data into the system. These commands are
dm-STATION_NAME-upload
dm-STATION_NAME-daq
Where STATION_NAME is the station name, in lower case with '-' removed. The two commands here are differentiated by the two methods for moving data into the system upload and daq. moving files using upload will move all files present in a directory at the time the command is used while daq moves will monitor files while active and move new files as well. Both of these commands require two parameters --experiment and --data-directory. With only these required parameters, these commands will create an experiment named by --experiment and will move files from --data-directory. Other parameters here will allow for specifying items such as a list of users, specifying the destination directory (relative to the storage directory), process a workflow using the data, etc.
Without the optional parameters, use of these commands would look like
dm-STATION_NAME-upload --experiment=exp1 --data-directory=/home/bluser/data/2010-03
This command will create an experiment with no users and move files from /home/bluser/data/2010-03 to STORAGE_DIR/STATION_NAME/EXP_NAME on the data storage server where
- STORAGE_DIR is the base storage location on the storage sever
- STATION_NAME is the station name defined on the experiment server
- EXP_NAME is the experiment name defined by --experiment, exp1 in this case
Adding other parameters to this command can add more information to the experiment such as --users to add a list of users to the system. Other parameters such as --dest-directory and --root-path allow customization of the path to the file on the data storage server. Some beamlines for instance have relied on particular directory structure for legacy analysis code.
Sector 8-ID-I for instance has a file structure ROOT_DIR/RUN/usernameYYYYMM with
- ROOT_DIR base level for experiment data. In DM this is STORAGE_ROOT/STATION_NAME
- RUN is the APS Run cycle such as 2019-1 (year and cycle 1, 2 or 3)
- username is some form to identify the experimenter
- YYYY is the four digit year.
- MM is a 2 digit month, i.e. 02 for February an example of this would be STORAGE_ROOT/8idi/2017-2/dufresne201707. Here we would use a command like
dm-8idi-upload --experiment=dufresne201707 --data-directory=/net/s8iddata/export/8-id-i/2017-2/dufresne201707 --root-path=2017-2
Sectors 33 & 34 use a file structure under ROOT_DIR/username/YYYYMMDD/EXP_NAME/. Here
- ROOT_DIR base level for experiment data. In DM storage server this is STORAGE_ROOT/STATION_NAME
- YYYY four digit year
- MM 2 digit month
- DD 2 digit day an example of this is ROOT_DIR/jenia/20140820/FeCrbilayers. Here we would use a command like
dm-33bm-upload --experiment=FeCrbilayers --data-directory=/net/s33data/export/33bm/data/jenia/20140820/FeCrbilayers --root-path=jenia/20140820
Creating experiments based on the ESAF/Proposal
For convenience, at APS, it is possible to make use of the Proposal and ESAF systems to create experiments based off the existing entries in these systems to populate the list of users in the system. the --proposal-id and --esaf-id options on commands like dm-STATION_NAME-upload and dm-create-experiment will add a list of users which are defined in the esaf or proposal to the created experiment.
Displaying information in the system
Other DM commands show useful information, and can adjust what and how the
information is displayed. dm-list-experiments lists the experiments showing
info on the experiment name, experiment type, station, and start date. adding the
option --display-keys can allow the user to display more or less information.
--display-keys=name will display only the experiment name, and --display-keys=ALL
will display all keys associated with the experiment (one experiment line is show
as example).
startDate=2019-12-09 18:35:26.738217-06:00 name=yuyin201912 description=Study of dynamics and aging in solvent segregation driven colloidal gel in a binary solvent (Proposal id: 64326) rootPath=2019-3 experimentStationId=5 id=3579 experimentTypeId=9 experimentStation={u'description': u'Sector 8 ID I', u'id': 5, u'name': u'8IDI'} experimentType={u'id': 9, u'name': u'XPCS8', u'description': u'XPCS Group (Sector 8)'} Adding the --display-format will change how the data is displayed. By default the output is a simple dictionary, --display-format=html will give HTML output.
<tr> <td>2019-12-09 18:35:26.738217-06:00</td> <td>yuyin201912</td> <td>Study of dynamics and aging in solvent segregation driven colloidal gel in a binary solvent (Proposal id: 64326)</td> <td>2019-3</td> <td>5</td> <td>3579</td> <td>9</td> <td>{u'description': u'Sector 8 ID I', u'id': 5, u'name': u'8IDI'}</td> <td>{u'id': 9, u'name': u'XPCS8', u'description': u'XPCS Group (Sector 8)'}</td> </tr>Specifying --display-format=pprint will give a nicer (prettier) output, breaking nicely on different lines, indenting properly where some items are objects.
{ u'description': u'Study of dynamics and aging in solvent segregation driven colloidal gel in a binary solvent (Proposal id: 64326)',
  u'experimentStation': { u'description': u'Sector 8 ID I',
                          u'id': 5,
                          u'name': u'8IDI'},
  u'experimentStationId': 5,
  u'experimentType': { u'description': u'XPCS Group (Sector 8)',
                       u'id': 9,
                       u'name': u'XPCS8'},
  u'experimentTypeId': 9,
  u'id': 3579,
  u'name': u'yuyin201912',
  u'rootPath': u'2019-3',
  u'startDate': u'2019-12-09 18:35:26.738217-06:00'}
Creating experiments based on the ESAF/Proposal
For convenience, at APS, it is possible to make use of the Proposal and ESAF systems to create experiments based off the existing entries in these systems to populate the list of users in the system. the --proposal-id and --esaf-id options on commands like dm-STATION_NAME-upload and dm-create-experiment will add a list of users which are defined in the esaf or proposal to the created experiment.
dm-station-gui
Overview
One of the methods to manage processes in the APS Data Management System is the
application dm-station-gui. This application is a PyQt application which gives
access to add/modify/control items such as experiments, file transfer to storage
location ('daq' and 'uploads'), workflows and processing jobs. An example of
this application is shown in the figure below.
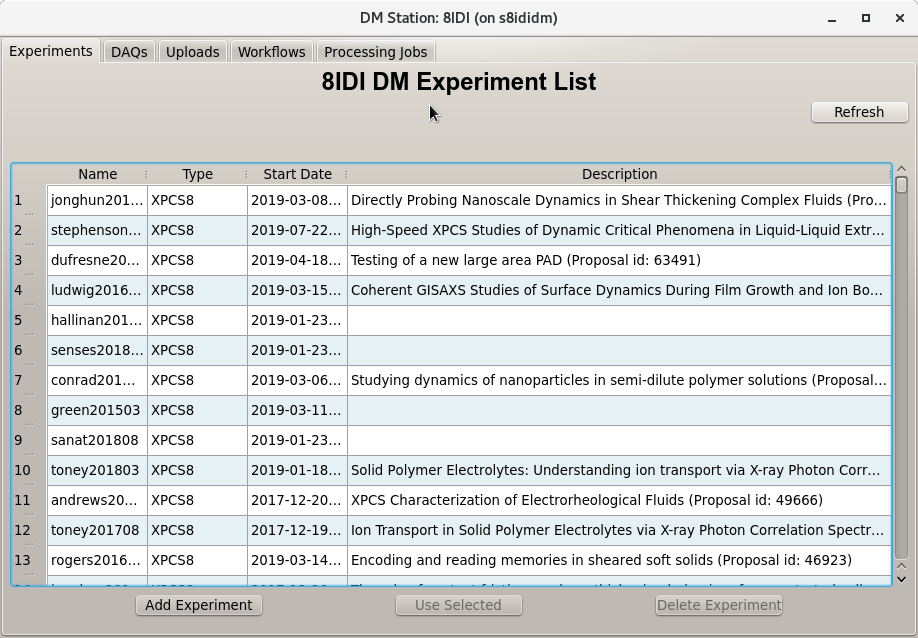
Experiments
dm-station-gui opens showing a tab that lists experiments which have been added
to the DM System. At the beamline, these experiments generally will correspond
to an accepted proposal in the APS Proposal system. Experiments in the DM
System define an entity that ties sets of managed data together. When an
experiment is selected by double clicking or by clicking and then clicking the
Use Selected button, the contents of the Experiment tab changes to give
details about that experiment. Much of this information is pulled from the
proposal/ESAF databases. This is shown in the image below.
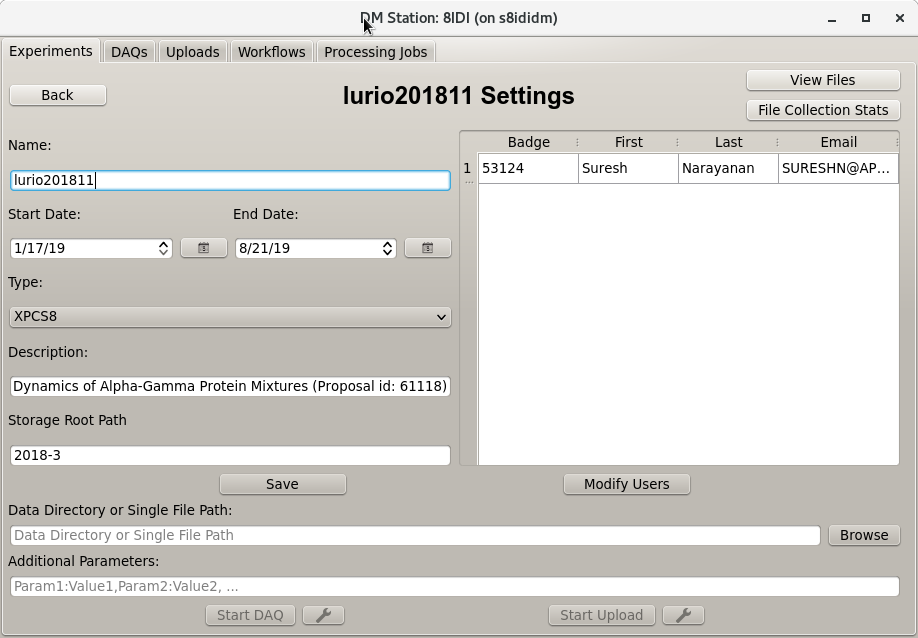
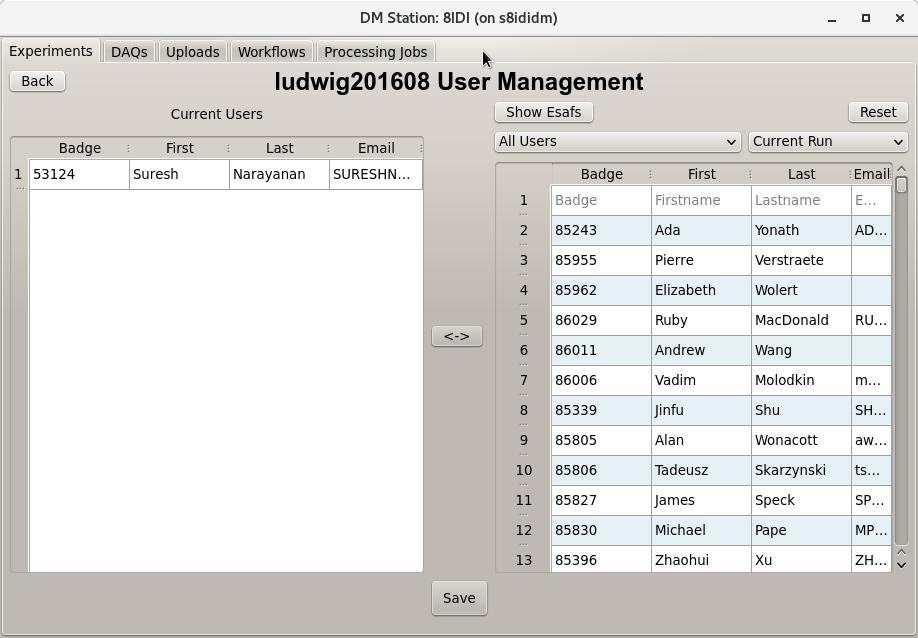
This view of the data enable a couple of key features of the DM System. The ability to associate files with the Management system, and the ability to set which users have access to the system and therefore which data they can access. Selecting users that will have access to experiment data is done by clicking the Modify Users button below the user list and then selecting users in the right list & pressing the arrow button between the lists to add users or selecting users from the left list and clicking the arrow button to delete users from the list. Click the Save button at the bottom to accept the changes and go back to the Experiment detail or click Back button in the upper left to exit back to Experiment detail without saving. This view is shown below.
Getting Files into Data Management
The overall purpose of this system is to get data into the system and providing
access control to that data. This means linking the data files to the users in
an experiment. For each beam station there is storage location defined for that
station. On the Experiments tab there are a couple of items relevant to
getting the data onto that storage location. These items are shown in the image
below. Files transferred onto the storage location will go into:
STORAGE_LOCATION/(storage_root_path)/(experiment_name). Files to go into this
directory are specified in the entry "Data Directory or Single File Path". Note
that if the data directory is specified, only the files will go into the
storage location, not a new sub-directory with the transferred files. Any
sub-directories will be copied as will the contents.
Once the the storage location and source are defined the transfer can be started in one of two ways:
- A monitor can be placed on the directory and any new files/sub-directories in the directory will be transferred if you select
Start DAQ - A one time copy will happen and all files/sub-directories currently in the directory will be copied if you select
Start Upload
When a transfer is started, the display will switch to either the DAQs or
Uploads tab. The tab will show the status of all transfers that have been
started since the last restart of the system. Status of a particular transfer is
shown by color
- green: Done success
- yellow: running
- red: Done with an errors
An example of this is shown below.
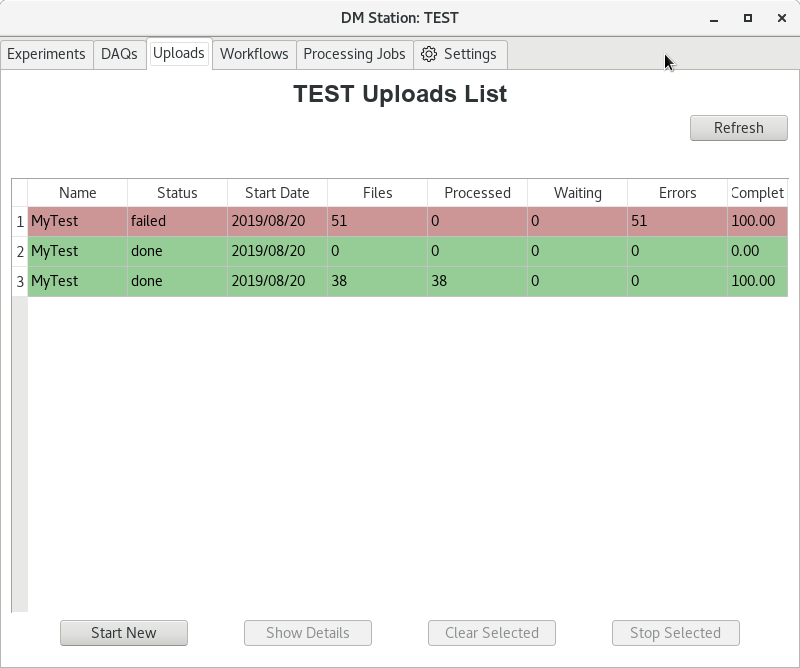
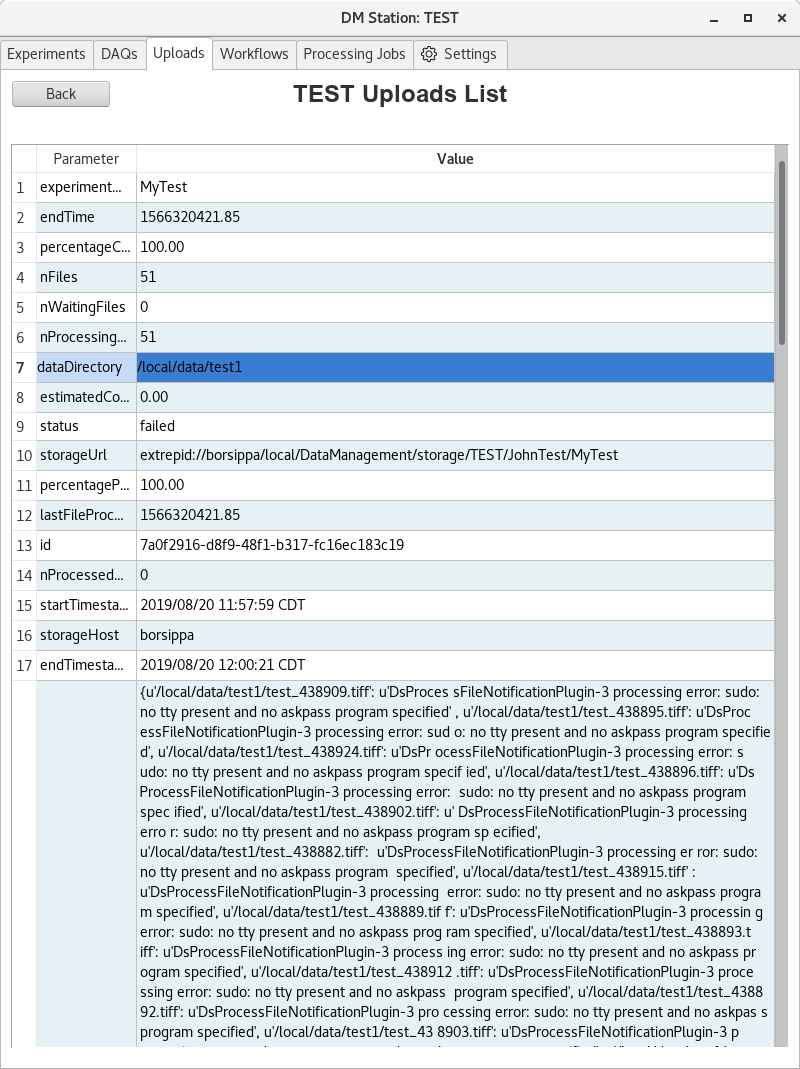
Clicking on a particular transfer, on DAQs or Uploads will switch the
view to show detail of that transfer including errors.
Workflows and processing data
The tab 'Workflows' allows defining a workflows which will provide a template for processing data. A workflow is simply a set of defined steps that will process data. Workflows each step in the workflow executes a command on the host computer. Commands can
- be as simple as a single command such as listing a directory
- can transfer files between computers
- can launch & monitor jobs on a remote cluster
- can do just about anything that can be scripted on a computer. Workflow steps allow defining inputs that are defined at runtime and can also create outputs that can be used in following steps.
The Workflows tab is shown below and contains a list of workflows that have been defined.
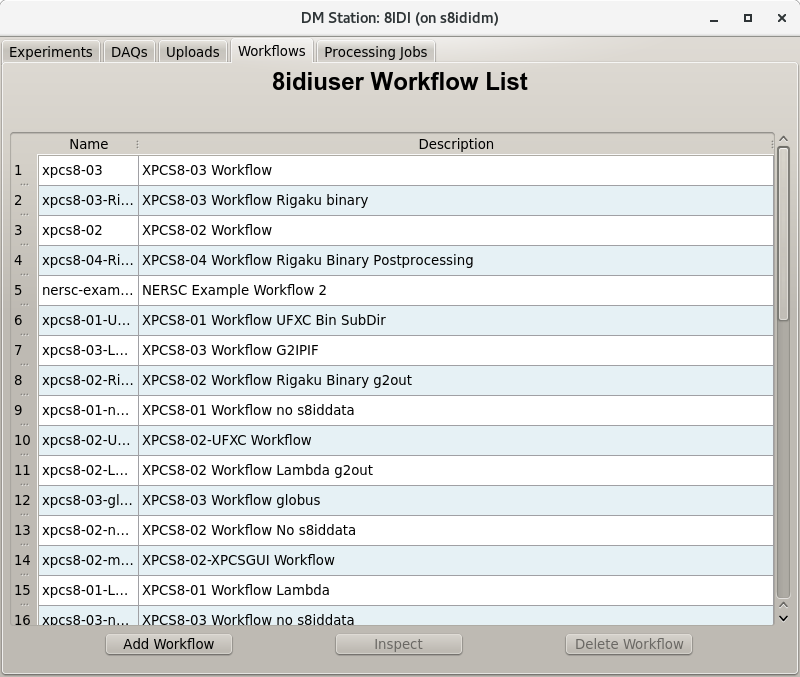
Clicking on a workflow and then selecting the 'Inspect' button you will be able to examine and possibly modify the steps in the workflow.